

A week ago I started to learn about HttpModules and HttpHandlers watching a pluralsight course by Robert Boedigheimer. First of all I want to really recommend this course, I learned a lot of stuff which I could not find in any other course, book or blog post.
As I already did in the past with another course, I want to add some comments and extend the HttpModule part. I refer to the course example with the serverMaskModuleGAC.
I walked into some trap doors and thereby I found another approach to simplify the installation process of the module to GAC a little bit. With this approach I am able to verify my custom config sections and module registration is correct.
Here is my approach:
1. When you have finished your implementation for serverMaskModule, install it in the GAC as usual by using the gacutil tool. By the way, there are some traps when you need to install it on Windows Server 2012. Here I am using Windows 8.1 64 Bit. I created my HttpModule with .NET 2.0 because it seems to be more compatible with different IIS and Windows versions. On Windows Server 2012 I was not able to install it with .NET version 4.5.
2. Copy your custom config section schema into the folder C:\Windows\System32\inetsrv\config\schema
3. Add the custom config section in applicationHost.config
4. Register your module by using IIS Manager. Click on the server node, and choose Modules:
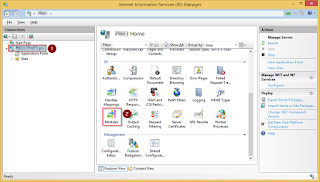

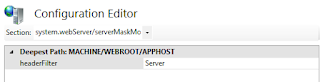
6. Click again on the server node and choose Configuration Editor


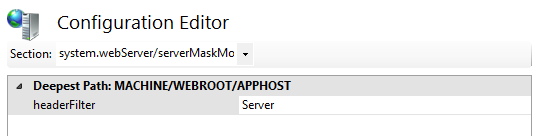
8. For testing purposes choose another value for header filter (In my implementation I have changed the parameter name from "name="serverMaskModuleGACHeaders" to "headerFilter"):
As long as the value is shown in normal print, it is the default value coming from the custom config section. When you change the value it will be bold printed, IIS Manager will add the config section in the applicationHost.config file.
9. If you did not get any error messages so far you can start sending your first test requests to verify the module is working and filtering the headers you have chosen in the in the serverMaskModule section.
The advantage of this approach is you can test and verify, that module registration and your custom config is validated. E.g. when you have a spelling mistake in your config section you will get an error messages like this:

As I already did in the past with another course, I want to add some comments and extend the HttpModule part. I refer to the course example with the serverMaskModuleGAC.
I walked into some trap doors and thereby I found another approach to simplify the installation process of the module to GAC a little bit. With this approach I am able to verify my custom config sections and module registration is correct.
Here is my approach:
1. When you have finished your implementation for serverMaskModule, install it in the GAC as usual by using the gacutil tool. By the way, there are some traps when you need to install it on Windows Server 2012. Here I am using Windows 8.1 64 Bit. I created my HttpModule with .NET 2.0 because it seems to be more compatible with different IIS and Windows versions. On Windows Server 2012 I was not able to install it with .NET version 4.5.
2. Copy your custom config section schema into the folder C:\Windows\System32\inetsrv\config\schema
3. Add the custom config section in applicationHost.config
4. Register your module by using IIS Manager. Click on the server node, and choose Modules:

5. Click "Add Managed Module"


7. Choose the serverMaskedModule section

9. If you did not get any error messages so far you can start sending your first test requests to verify the module is working and filtering the headers you have chosen in the in the serverMaskModule section.
The advantage of this approach is you can test and verify, that module registration and your custom config is validated. E.g. when you have a spelling mistake in your config section you will get an error messages like this:
